

How Can I Install or Turn on Telnet on Windows 10 or 11?
Introduction
Telnet is a network protocol that allows command-line interface-based distant device access and management. Even though more secure possibilities like SSH have mostly taken its place, some users still use Telnet to test and troubleshoot network connections. For safety reasons, Windows 10 and 11 do not come with Telnet installed or enabled by default. Nevertheless, if essential it can be manually installed and activated.
On Windows, Telnet can be enabled through the Command prompt or the control panel. It is a forthright process that calls for administrative rights. Once installed, Telnet commands can be entered by the command line to access distant computers. Telnet lacks encryption, which leaves data transmission open to interception, even though it is useful for some jobs. Consequently, it ought to be used carefully, ideally on dependable networks. The procedures to install and activate Telnet on your windows computer will be outlined in this guide.
Tell me about Telnet and how it operates
Telnet stands for teletype network. It is a client/server application protocol that offers access to effective terminals of remote systems on local area networks or the internet. The local computer uses a telnet client program and the distant computers use a telnet server program. Telnet is a type of protocol that allows one computer to connect to the local computer. It is used as a standard TCP/IP (transmission control protocol / internet protocol) for virtual terminal service which is delivered by ISO.
Here are some key points about telnet:
Function
Client-server model
Unencrypted communication
Port usage
Basic usage
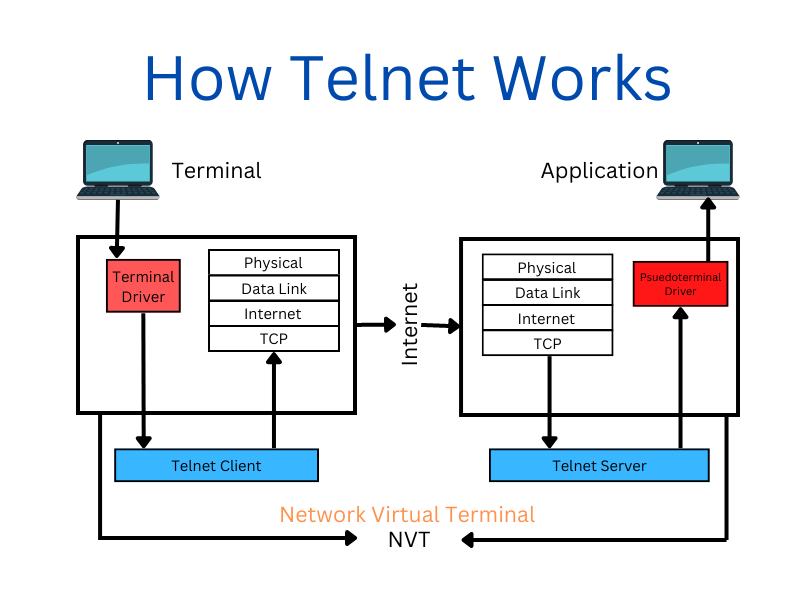
How Telnet works:
Establishing a connection – The remote computer’s telnet server obtains a connection request from the telnet client, which contains the desired port (often 23).
Authentication – The server may ask the users for their username and password in order to authenticate after the linking has been made.
Command execution – Following successful authentication, the user can enter commands straight into the terminal window, and the server will execute them distantly.
Response display – The user’s terminal shows the output of the commands that were sent back to the client by the server.
Telnet Enablement in Three Steps for Windows 10 and 11
There are three simple or easy ways to install or enable Telnet on windows, which are listed below. A quick look at them is in order!
Telnet can be installed in Windows using the Command Prompt
– Launch the command prompt in administrator mode.
– Enter the following command:
dism /online /Enable-Feature /FeatureName:TelnetClient
– Await the completion of the installation.
Telnet can be installed on Windows using the Control Panel
– Open the control panel.
– Navigate to Programs -> Turn windows features on or off.
– Scroll down and check the Telnet client.
– Click OK and wait for the windows to install it.
Telnet may be installed on Windows using PowerShell
– Open PowerShell as administrator.
– Run the following command:
Enable-WindowsOptionalFeature -Online -FeatureName TelnetClient
– Restart if necessary.
Use Windows to run the Telnet Command
You can use the simple methods listed below to run the Telnet install command in windows:
– As an administrator, launch PowerShell or the Command Prompt.
– Type “telnet” and then the hostname or IP address of the device you want to connect to remotely. Then, hit Enter. Illustration, to join a device consuming the IP statement 192.168.1.1, type “telnet 192.168.1.1” and then, press the enter key.
– “Microsoft Telnet>” will appear on the screen if the connection is positive.
– You can now type telnet commands to communicate through the remote device. For instance, if you need to check the status of a service, you can type “status” monitored by the name of the service.
– Type “exit” into windows and hit enter to end the Telnet command.
Check the status of the Windows Telnet client
The following procedures can be used to check the Telnet client status on windows:
– As an administrator, launch PowerShell or the command Prompt.
– Type “telnet” and formerly, hit enter.
– If the telnet client is connected and working, you will see a screen that reads, “Welcome to Microsoft telnet client,” along with the version number.
– If the Telnet client is not installed or working, you will perceive the message “Telnet is not documented as an internal or external command, treatable program, or batch file.”
– By capturing the subsequent command into PowerShell, you can also check the Telnet client’s status.
“Get-WindowsCapability -Name Telnet.Client*”
You will see “State:Installed” if the Telnet client is together installed and enabled, “State:NotPresent” if it is not yet connected, and “State:InstalledPendingReboot” if it is installed but disabled.
Conclusion
Though Telnet on windows is still a useful tool for testing specific ports and performing basic system connectivity checks, its lack of security features means that it should be used carefully and chiefly for troubleshooting; network administrators can still diagnose connectivity matters by using Telnet, but they must always be aware of its restrictions. More secure protocols, such as SSH, are favored for remote access and management of their encryption capabilities.
 Google Workspace India: Smart Business Email & Collaboration Solution
  Why Are SMEs Choosing Tally Cloud Hosting India for Better Productivity?
  Why SSL Certificate India Matter for Business Websites in 2026?
  Scale Your Digital Agency with Reliable Reseller Hosting India Solutions
  How Shared Hosting India works best for Beginners & Small Businesses?
  Traditional vs AI-Optimized Hosting: What’s Best for Your Business in 2026?